Sunday, March 15, 2015

Brass Handles from Desk clean up

Well you know from the previous post that the brass handles on the desk were pretty dirty and painted over.  Here's a recap.

Now I tried the brasso first and nothing happened.  So I pondered for a moment, then decided to use my nail varnish remover (sure turps or white spirit would do).  I soaked them in a tub for a couple of minutes, then took an old toothbrush and gave them a scrub. Sure enough the paint, stain or whatever came off.

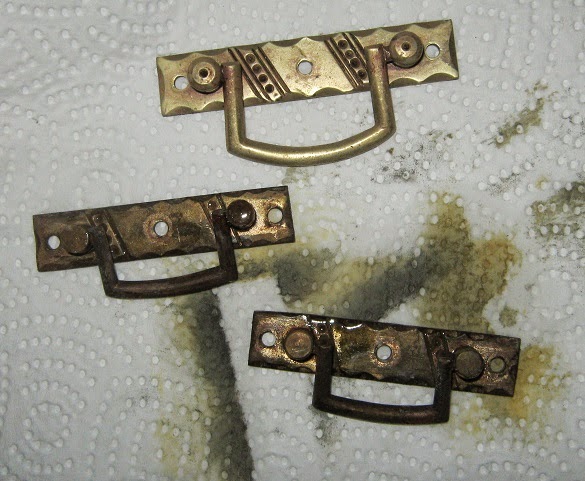
Step 2: Get an old pot, add 1/4 part salt to 2 parts vinegar, & 2 parts water, throw in the brass and boil for a minute or two.  It will go red or black, this is part of the process, don't fret!  See the pic below, the top one has been rubbed with brasso but not buffed.


Step 3: Rinse with water and dry.  Get the brasso and polish away as normal, buffing to a lovely shine. 


And there you have it, good as new handles.  Of course being me, I forgot to throw in the little screws and had to do the whole process all over again!

Saturday, March 14, 2015

New Project - Edwardian dressing table

I've been drooling over those lovely shabby chic retro desks and dressing tables for a long time.  Now after the move and re-arranging of where things go.  I noticed I needed some sort of desk, but I didn't want a modern one, I wanted something solid, which in my opinion is usually an old piece of furniture (they don't make them like that anymore).

Just by chance I took it into my head to have a nosey at what was around.  I came across this little gem for sale by Shabby Shik Emporium, by pure luck.  I'm so excited about it I just had to share.

Sadly one of the castors is broken so I can't use them. It was originally a dressing table and is missing the mirror on top between the two top drawers.  I'm fortunate in the fact I can see potential in almost everything.  Yes it has certainly seen better days and some would throw it out, or use it in the shed.   Even my other half just shook his head at me when I arrived home with my bit of treasure (he thinks I'm crazy, but knows I can transform it somehow).
I had taken it apart, then popped it back together to take a photo, as you can see the castors have been removed. One of the screw heads had split in half so I was a lucky girl to get it out.  I'll have to find a replacement for them to raise it up so I can sit with my legs under it.  I've given it a good wash, so that is step one done.  It has been treated for woodworm, which it needed as there were some in the back legs and table top.  I think this might limit my options a little, as I had planned to sand it down and maybe just varnish it, as the original wood is light.  
Idea no.2 is to paint it all cream, except for the drawer fronts and top of the desk which I hope to sand down to the natural wood and just varnish.
The middle drawer has no support, the wood is missing from underneath, so that will be replaced.  I'm thinking about adding drawers to either side too.

So if your looking for Antiques or other little treasures, I strongly suggest you check them out.  At time of writing they have stock for sale on Donedeal & Etsy, you can follow them on Facebook and you can read Jeans blog.  I can say that their little cabin is just a treasure trove, with furniture, teddies, leather bags, jewelry and loads more. 


Sunday, February 22, 2015

Quick Cable Aran

The pattern Cabled Yoke Pullover is from Patons and free. Yipee! This is the actual image from Patons.

This is knit in the round, once you have done the cable part that sits on the shoulders.   I really think that the pattern should ask for provisional cast on and kitchener stitch.  I knitted the cable then sewed it together and it was messy and you have that seam lump.

I didn't take it back, instead I grafted it together as neatly as I could.  Not by any means perfect but a lot better than having a seam.  Especially since the join is not going to be either in the middle back or at the side.  It will be lined up with the sleeve seam at the back, unless you are a whizz and calculate to perfection. (Not me!)

My stitch pick up for the body was a little messy, but I managed to tidy it up afterwards.  I knitted the body as written, however it was longer than stated in the pattern, which is fine by me as I added to this too, instead of 8 1/2 inches I made it 11, then did the cable rib.

When doing the sleeves I didn't do the cast on 6, I picked them up from the body instead.  Decreased down to 42 stitches and did the rib.  If I did it again I think I would go down to 48 and then make a longer rib for the sleeves to match the body.

I knit the neck up as the pattern asked, but it was so wrong for me.  There was to much bulk there and it looked just plain weird.  So I cast on 11 sts per cable pattern repeat, did the decreases in every 11sts repeat instead of every second one, until I had 3 twists and then cast off.  No high neck for me, I can hardly bear things touching the front of my neck.

Looks a bit odd in the photo, but it's a good fit and very wearable.
 

Thursday, February 12, 2015

The "I ran out of yarn" Cardi

This cardigan has been on my needles for years.......... yes I said years.  I think I did so much knitting, that I just ran out of go go juice.
Anyway I picked it up again at the end of last summer, and of course had to unravel enough to make anyone cry, due to having to make it smaller since we both started looking after ourselves a bit better and lost a good few kgs of weight.

This is the first time ever I have ran out of yarn.  I'm so shocked, they must be less yardage on the ball or something......... probably why it's not written anywhere on the label.
 I managed to get some ribbing onto the neck, but not enough for my liking.  As for the button borders, well no sireee are you getting them, you ran out of yarn remember.  I added a zip instead, well what else could I do?
I knew what kind of reception was coming before I handed it over.  The collar is too low and the sleeves are a tad too short.  Exactly what happened......lol....... I said well I ran out of yarn sweetie, if you don't want it, I can put it to one of the charity shops!
This is the same person who managed to felt a lovely pair of hand knit socks, that my mum made him!  And all he said was oops!  Mind you they fit me now and are well cosy ;)

Sunday, December 28, 2014

If the RSA did Dog Vests

I know it's been a while, all my stuff was packed up for the 1st half of the year because of being given notice to quit my accommodation.  The new place fell through on our move out date and we eventually got a place in July.  The rest of the year has flown by.

So back to the task at hand, I rescued a pooch and he's been the light of our lives, as well as a huge handful in the beginning.  Thankfully he's less like a wild dog and more a cuddly ball of fluff now.

I wanted to make a quick and easy coat for our winter walks.  I had a hi-visibility bag (which I think might be waterproof too), it was meant for shoes or gym kit, you know, the kind with drawstrings.

Basically I unpicked the stitches and removed one of the reflector strips, then cut it in half.  I drafted a basic pattern, by using a paper rectangle and putting in over the dog (much fun he thought).  I folded it in half lengthwise, cut out a U shape for the neck.  Tried it on again to see if the tips overlapped at the front.  Marked the tailed length and the depth.  Then laid the folded sheet on the floor, to draw another U shape from the tail to the front.  Tested it on the pooch to see if it was ok.

All looking good I cut out a piece of the bag and pinned cotton twill tape all the way around the edge.  As seen in the photo below.


As you can see it looks just like a bib vest.  After carefully sewing the tape, I added Velcro to the front closure. At this point I fitted onto the pooch (who still wasn't fed up) to locate the best place for the strap.  Using the cotton twill tape, I pinned it to one side and measured it under the  belly until it overlapped the hem on the other side by 2cm, I gave it an extra 2cm to fold over and sew on another bit of Velcro.


Ta-Da!! Here's the little rascal modelling his new vest. Note the bits of paper he was shredding while he was waiting.


Thursday, June 19, 2014

Shoe Dye

Gosh it's been a long time since I posted.  Well am still waiting to move into my new pad and I've boxed up my creative side.
Well I decided to give some preloved shoes a bit of a makeover.  Now as gorgeous as these shoes are in red (which I adore) I don't really have anything to wear with them.  I love the style so much I decided to have a go at dying them black.......eeeekk!

I used Black Dylon Leather Shoe dye it comes in liquid form in a little bottle with brush. Now before you get all excited, this is like mixing paints, whatever colour your shoe is and whatever colour the dye is will determine the outcome.  So  in my case red + black = Brown (yellow + blue = green) get the idea....... wish it had said that on the outside of the darn box!  Anyway I was lucky.

You will need 
  1. a cloth 
  2. white spirit 
  3. newspaper or glossy mag/plastic sheet
  4. rubber gloves
  5. old plastic tub
  6. tissue
  7. Shoes
  8. Dylon Dye
  9. Shoe Polish (Kiwi is my fav)
So to prepare the shoe for painting, you have to clean them with white spirit thoroughly to remove any polish so the dye will absorb, I must have been a bit lazy or not as thorough as there was one patch that didn't take as well as the rest.  Once that's done you have to let them dry and stuff the shoe with newspaper.  Then you are ready to paint.
I recommend  using a glossy mag or plastic sheet to cover the surface you are going to work on as the dye if dripped/spilled will seep through newspaper.  Also a plastic apron as the paint can splatter if you're not careful.
Shake the dye bottle well and pour a little into the tub. Apply paint evenly all over the shoe (careful not to put too much on the brush as it will dribble all over the shoe and work surface) Now at this point it will look pretty rough and you might go into panic mode....... don't worry.  Let it dry and continue to paint the shoes paying particular attention to any spot that might be patchy, until you get an even look.  Now I saved a little in the bottle just in case, I need to do a touch up some time in the future.
At this point mine looked a minky brown/black and some patches had a sort of metallic hue to them.  To be honest I was a bit worried. 

I let them dry overnight (as we had fab weather and it was hot).  In the morning I had to decide which polish I was going for Black or Brown (either would have been lovely), I went for black as that is what would go with most of my wardrobe.  I applied the polish thoroughly to the shoe but did not buff.  Here is a photo of the shoes with the right one with polish applied.

I left them to soak up the shoe polish for the rest of the day, then buffed them to a shine in the evening.  The polish made them darker and almost jet black, and made the colour even getting rid of the patchy metallic bits, so I'm really pleased with the end result.

Wednesday, January 1, 2014

Happy New Year!!!


Bliadhna Mhath Ùr 

Glückliches neues Jahr
 
Athbhliain faoi mhaise dhaoibh