I just have to share a post with you on tyre upcycling. Some are new ideas, others are old favourites just follow this link for ideas
Just like the title says Odds 'n' Ends. From life to crafting and recycling, which is my thing at the moment.
Saturday, June 27, 2015
Wednesday, May 20, 2015
Second Canvas Sneak Peek
Whilst the first attempt at canvas painting went kind of alright. I thought I would have another attempt. Well I am beginning to wonder, if perhaps I am a bit ambitious or just a little impatient. For the second one I decided on doing a cockerel, on paper it would be a doddle, with my other paints. I'm starting to wish I chosen a different subject.
I keep telling myself just to keep at it and build on it, that it'll be worth it in the end. Although it is now a bit further on, than pictured above. I wanted to go at it some more, however the light wasn't right. There have been too many dull days and for some reason I can't quite work the colours with the indoor lights on. Perhaps I need new glasses.
I haven't decided yet whether to keep it to a white background or fill it in. I suppose I'll see how I feel once it's done ~ whenever that may be.
I can safely say there will be nothing ambitious for the large canvas that's left, or even the smallest one for that matter!
Tuesday, May 19, 2015
More Charity Cards
I have been a little active in the creative department, however, I have been falling behind in the posting of it all.
This is the next bundle I made, not so many Christmas ones this time! I'm trying to use up all the bits and pieces that I have saved or hoarded, as well as using up card stock that has mounted up. Really about time I got around to using it.
I really like bright colourful card, it's just so much more happier somehow.
Saturday, April 18, 2015
Painting
I had
this crazy idea, that I would like to do some painting, basically to
fill the empty walls of my new home. I bought the canvas set in
Lidl, don't know how good they are, but they didn't go quick, so am
thinking that they are not so good, for the professionals anyway. The
fact that they sell tiny tubes of paint made me really laugh out loud
in the shop....... wondering how many you would need of them to fill
a canvas and would it even do the small one? What would I know
anyway, I've never in my life painted on canvas........ they really
should teach you that in school too.
Next step
was finding paints that were affordable (after all, this is a first
attempt). Who'd have thought getting the basic ones would be so
hard. Black, White, Blue, Green, Red and Yellow. I couldn't find the
yellow anywhere?? Turns out the white was totally crap (cheapo
brand) and transparent when painted, I ended up taking the pot of
ceiling paint from the shed and using that instead.......... so the
next trip to town is going to be in search of some white and yellow,
plus maybe a few other colours for the 'coughs'
next one.
I wanted to paint a cow, and wanted to do a different style from my
norm (when I have the urge to paint that is), it was supposed to be
simple blocks of colour and fun. Nothing fancy.
I can say, it didn't turn out like I wanted and in the end I decided
to just stop what I was doing and leave it as it is, before I made a
complete mess.... I'm still trying to decide whether to like it or
not, perhaps it will grow on me, as I have to look at it daily.
I suppose if this was something I wanted to branch out into, I would have to invest serious money into good brushes and Daler Rowney paints (I'm sure there's a reason Easons don't diplay the price).
Tuesday, April 14, 2015
Card Recycle
Now that
I finally have my desk to work at, I can make a start on recycling
all the cards and other bits, that I have stored in a box for the
last year and a half.
I'd
bought some coloured card and envelopes to make some cards to donate
to an animal charity. I'd also bought some card stock in Lidl and
won a pack too, so it really was calling on me to get going. It's
great when you know what exactly you're going to do, unfortunately
this was not me and therefore, the card making session was time
consuming and most of that was spent cutting bits of card and
toppers.
The first
session went quickly, as I was making a bundle that were the same and
also some toppers which I'd made months ago. However
the next lot, was a case of trying to decide how to reuse the bits,
what card or paper went with them and what colour of card to stick
them on.
As you
can see I only made a few in the afternoon, and it wasn't till I was
nearly done that I realised most were Christmas cards, which made me
laugh. I'll be keeping one or two for myself.
Sunday, March 29, 2015
Dressing Table Completed
It's taken a lot longer than I expected due to health reasons, but it's finally done. (Except for some fine tuning).
The brass ringlets on the feet were the biggest challenge to me, not the rusty screws that broke and remained in the holes, nor the ones where half the head broke off, but by some good fortune I was still able to remove.
These lovely things were so tarnished, that even brasso just bounced off them with no effect. I tried the boiling method, nada. Ketchup..nope. Coca Cola on the other hand cleaned them fabulously, with the help of my little wire suede brush.
I'm so pleased, as I really wanted to use them to hide the join of the new feet. Since one of the castors was seized and the other broken, there was no hope of keeping them. The beauty of the rings is that they have a lip inside, one part fits the table leg and the other was hopefully the perfect fit for the new feet.
First thing I did was clean the whole desk, followed by removing all that could be removed. Top drawer units came off, as did the back lip. Took out the front drawer and the two panels. Removed the castor feet, this required a bit of effort.
Next I sanded down the whole thing. The top I took back to the natural wood, filled in the holes with wood filler and stained with antique pine before varnishing. I did the same to the drawer fronts and panels. I added a bit of wood to the front and two underneath for drawer rails, all of which were missing.
The legs I obviously had to sand by hand so that the paint would bind. I used Gloss paint from Woodies DIY, I have to say I hate gloss painting, but this was so easy to apply. The first coat just got soaked up, so I let it settle for a day or so before applying the second coat. Waiting for everything to dry fully is not one of my strong points, but it has to be done. Since I was doing this outside, I was also hoping that it wouldn't rain! Of course the second coat was done indoors for 2 reasons, it rained and it turned very cold..... no good for painting.
For the new feet I bought pine knobs, stained with antique pine then varnished same as the top. I had to drill bigger holes into them and made my own dowels to fit, because I came home thinking I had some, only to find out that they were too small.
I also wanted a really cool liner for the drawers, seems to be plenty choice in the States, but here appears to be very limited. You could use a nice wall paper or wrapping paper. I just went with a Nordic folk print design, which I tiled on paper and printed out. For the small drawers this is easy but for the big on I had to use 4 sheets and glue the tiles together. I could use sticky back plastic to protect the paper, but for now and the photos this is it.
So just to remind you, this is how it started off, very rough and a bad paint job.
And now it has been turned around into my little treasure, and is a keeper for sure. If I put a mirror standing in the center it can be a dressing table. Or I can use it as my craft desk as it is. I'm really pleased at how it turned out.
So keep your eye on Shabby Shik Emporium and you might find a little gem too. Don't be afraid to ask if they have project pieces. You can find all the links to them in my other post.
Sunday, March 15, 2015
Brass Handles from Desk clean up
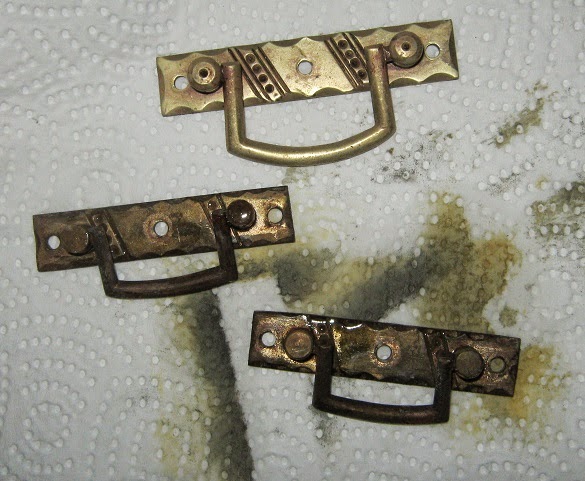
Well you know from the previous post that the brass handles on the desk were pretty dirty and painted over. Here's a recap.
Now I tried the brasso first and nothing happened. So I pondered for a moment, then decided to use my nail varnish remover (sure turps or white spirit would do). I soaked them in a tub for a couple of minutes, then took an old toothbrush and gave them a scrub. Sure enough the paint, stain or whatever came off.
Step 2: Get an old pot, add 1/4 part salt to 2 parts vinegar, & 2 parts water, throw in the brass and boil for a minute or two. It will go red or black, this is part of the process, don't fret! See the pic below, the top one has been rubbed with brasso but not buffed.
Step 3: Rinse with water and dry. Get the brasso and polish away as normal, buffing to a lovely shine.
And there you have it, good as new handles. Of course being me, I forgot to throw in the little screws and had to do the whole process all over again!
Subscribe to:
Posts (Atom)